Civil engineering senior project lab (0077 Fiedler Hall) instructions
Download PDF copy of instructions.
Technical Support
Engineering Computing Services
785-532-4643
support@engg.ksu.edu
To turn projector on 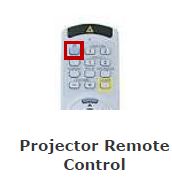
- Locate the projector remote control on the presentation desk and press the Power button.
- At the start up, a green light will indicate the projector is powered on.
To turn projector off
- Locate the projector remote control on the presentation desk and press the Power button.
- Power Off? Will be displayed on the screen. Press the Power button again (within ten seconds) to turn the projector off.
To use the presentation computer
- If the presentation system is not on, press the Power button to turn the presentation system on.
- There are four USB ports available on the front of the presentation system for use of a flash drive or other USB device.
- After powering on the projector, if the computer is not displayed, it may be necessary to tell the desktop to direct signal to the projector. Locate the
 key on the keyboard, hold it down, and press the "P" key simultaneously. Windows System display mode will appear (see below), and you will want to select Duplicate.

To use a laptop
- Plug the provided VGA cable into your laptop and properly secure.
- The projector will automatically select the correct input for the laptop display.
- It may be necessary to tell your windows laptop to direct signal to the projector. Locate the key on your laptop, hold it down, and press the "P" key simultaneously. Windows system display mode will appear, and you will want to select Duplicate.
- If you are using a Mac laptop you will need to connect the provided VGA cable, click the upper left-hand Apple menu, select System Preferences, then Displays, and finally select Detect Displays. Please locate your computer manual for the keyboard shortcut.
- Warning: Security software on this computer will erase all changes made on the next reboot. This includes any files or data you may have created. These lost files are non-recoverable. Please use your network drive (H:) to store any important data.
